In order to connect a domain with blogger, you first need to have a purchased domain somewhere and have a minimum of DNS management or a hosting account there.
It is certainly necessary that you have any access to DNS settings, with us it is located in cPanel. Even those who have only purchased a domain have access to cPanel with DNS only options.
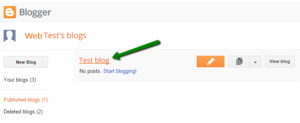
First of all, you need to add the domain to blogger. When you log in to your blogger account, click on your blog so you can add a domain.
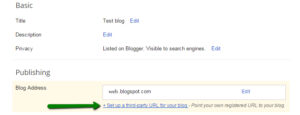
After that, click on Settings and then on Basic
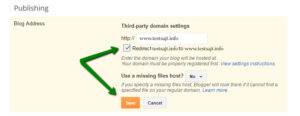
On the new page that opens, find the Publishing section and then click on: + Set up a third-party URL for your blog
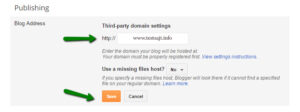
Then in the domain field enter the domain but it MUST contain www at the beginning even if it is a subdomain for it to work. Keep that in mind!
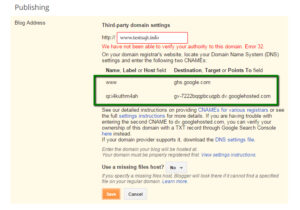
When you save you will see two CNAME records that you need to add in your DNS configuration to associate your domain with blogger.
The first CNAME is the same for everyone who wants to set up blogger, ie the one with www. And this second CNAME record is different for each domain ie blog you link.
Now you need to login to your cPanel account and then find the option Advanced Zone Editor
After clicking, a page will open where in the first half you have input fields and in the second half what has already been entered (automatically after creating an account).
In the second half, which is called Zone File Records you will see something like www.testsajt.info and where in the extension it says CNAME so testsajt.info you have two links Edit and Delete. It is necessary here to click Edit. Immediately below, an entry field will open for you in the field for CNAME (where it says only testsajt.info), enter ghs.google.com and save by clicking on Edit Record.
This has solved the first part of the CNAME record that is required on blogger.
Then the second part you need to go to the first part of that same page where it says Add a record and in the first field where it says Type select from the drop-down menu CNAME.
In another field called Name, enter the first value that is required on blogger from you in our case it is qci4kuthm4ah (the one on the left is shorter) just copy it.
Then in the third field which is called TTL simply leave blank will be automatically filled in.
And in thethe fourth CNAME field enter what is right sidebar on blogger the larger one which in our example is gv-7222bqqpbcuqpb.dv.googlehosted.com.
When you're done, click Add record.
After you have finished entering this return to blogger to finish adding the domain.
Click Save.
If the settings are good, you should get something similar to the image below:
Note that after changing the values you need to wait a few minutes (preferably half an hour) before returning to blogger and clicking save.
Then click edit and make sure your domain points to www.
With that, you have officially connected and completed the connection. You don't need to do anything else.
